Introduction
This page aims to provide guidance on setting up a full GCC-based toolchain on a contemporary Windows platform. I’ve formulated these guidelines using my Windows 10 system, but they are generally applicable to Windows versions dating back to Windows 7. In earlier Windows editions, you might consider using WinAVR, which used to be the recommended method for establishing this toolchain on Windows, even bordering on being semi-official. However, it has not received updates in quite some time. It’s worth noting that while the WinAVR installer is rumored to cause issues on more recent Windows versions, it should function well on Windows XP.
Install Git
Our starting point will be the bash shell provided by Git. It’s a straightforward installation, and if you’re working with Git on a Windows system, you may already have it. Simply access the Start menu and search for “Git Bash.” If it appears in the search results, you’re good to go. If not, you can easily obtain it by downloading and installing Git for Windows. The default settings in the installer will suffice for our needs.
Install the Atmel GNU Toolchain
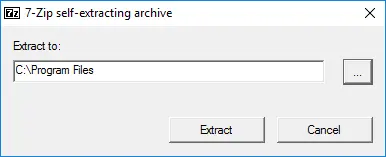
Obtain the Atmel AVR Toolchain for Windows by downloading it from Atmel’s official website, and proceed to execute the installer. When prompted to select the extraction destination, click the “…” button and browse to the C:\Program Files directory, then select the Extract option.
Install GNU Make
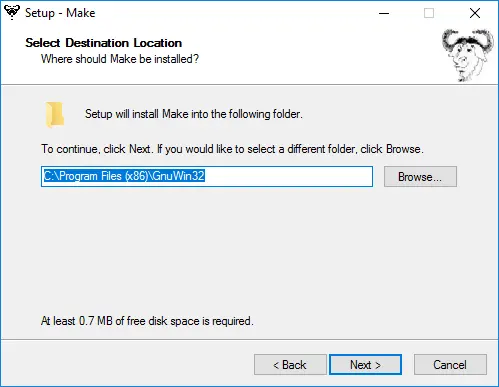
Retrieve Gnu Make by downloading it and then proceed to run the installation process. Opt for the default installation location and decide whether you wish to have an icon added to your start menu.
. Unzip the archive, and copy the archive inside to C:\Program Files.
Update your PATH
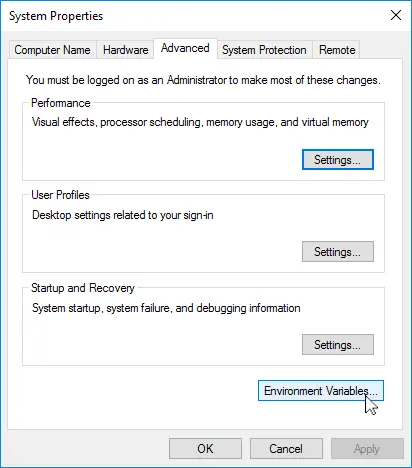
We must now instruct Windows on where to find the recently installed tools when you enter their names in the command line. To do this, access the Start menu, open the Control Panel, and navigate to System. In the left-hand panel, select “Advanced System Settings.” Within the Advanced tab, click on the “Environment Variables” option.
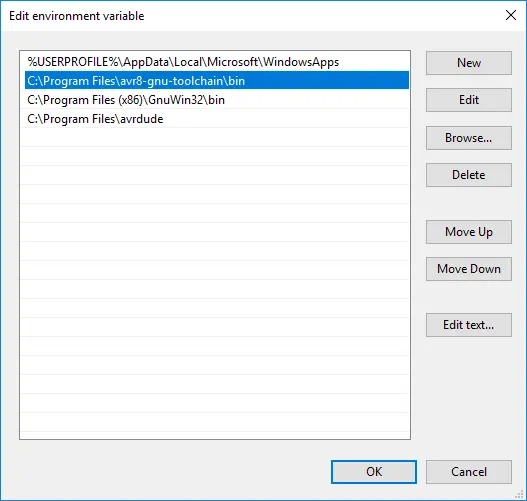
In the User variables section, choose “Path” and then click on the Edit option. If you don’t currently possess a variable labeled “Path,” click on the New option to establish it. Enter “Path” as the name, and input the specified value as outlined below.
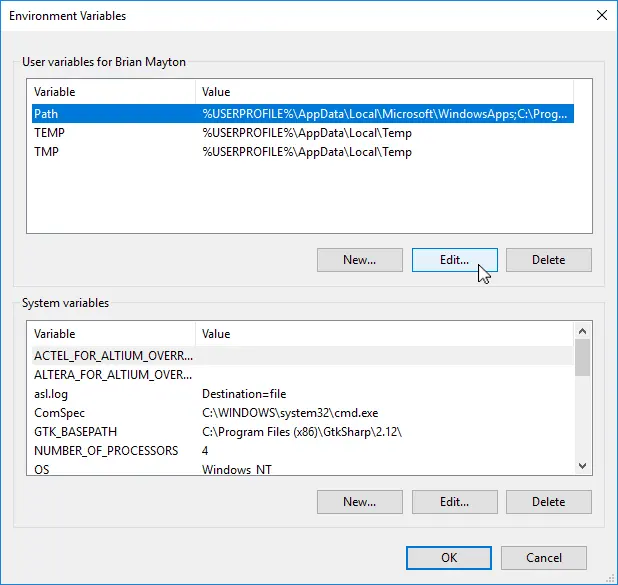
The Edit window that appears varies depending on whether you’re establishing a new variable, have only one item in your path, or have multiple items in your path. In the first two scenarios, you’ll encounter a single-value textbox. In the third scenario, you’ll encounter a list of values. Regardless of the situation, you need to include the following three values. If you see a list, add them as distinct items (refer to the screenshot below). If you see a textbox, input these values with semicolons as separators. Ensure precision in your entries, as Windows won’t be able to locate the programs otherwise.
The three values to add are:
- C:\Program Files\avr8-gnu-toolchain\bin
- C:\Program Files (x86)\GnuWin32\bin
- C:\Program Files\avrdude
Click OK on all of the windows you’ve opened.
Install Drivers for your Programmer
This guide assumes that you will be using a FabISP, FabTinyStarISP, or another programmer based on USBtiny. If you’re using one of the official Atmel programmers, the most straightforward way to obtain the necessary drivers is by installing Atmel Studio.
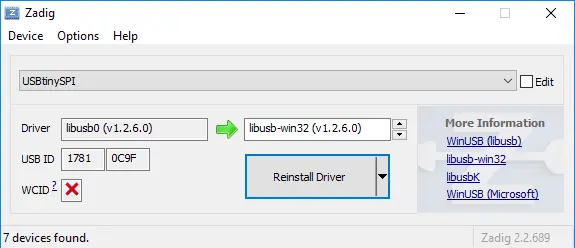
For USBtiny programmers, the installation process becomes more complex due to Windows 10’s driver signing policy. Thankfully, there’s a tool that simplifies this procedure. Download and run Zadig. Connect your programmer and choose the “USBtinySPI” device from the provided list. If it doesn’t appear, access the Options menu and select “List All Devices.” The driver you need to install (located to the right of the green arrow) is either libusb-win32 or libusb0. Click the “Install Driver” button. Typically, you will only need to perform this step once.
Sanity Check
All installations are complete. It’s time to verify their functionality.
Navigate to the start menu and locate “Git Bash,” then launch it. This terminal window should be your go-to choice when other tutorials instruct you to open your terminal.
Confirm that the installed commands are functioning as expected:
make
Enter the command “make -v” and hit the enter key. You should observe the following output:
GNU Make 3.81
Copyright (C) 2006 Free Software Foundation, Inc.
… and so forth.
If, instead, you encounter an “command not found” error, please double-check your make installation and ensure that your path variable does not contain any typos.
avr-gcc
Enter the command “avr-gcc –version” and hit the enter key. You should encounter the following output:
avr-gcc.exe (AVR_8_bit_GNU_Toolchain_3.5.4_1709) 4.9.2
… and so forth.
If you receive an “unrecognized command” error, double-check your Atmel toolchain installation and ensure there are no typographical errors in your path variable settings.
avrdude
Please connect your programmer to a USB port and enter the following command: “avrdude -c usbtiny -p t45” and then press the Enter key. You should observe the following outcomes:
1. If you see the message “avrdude.exe: initialization failed, rc=-1,” it indicates that avrdude has successfully detected your programmer but couldn’t establish communication with a target board. This is expected when there’s no device connected to the programmer.
2. If, on the other hand, you encounter the message “avrdude.exe: Error: Could not find USBtiny device (0x1781/0xc9f),” it suggests a problem with your USB driver installation, and you may need to review the steps involving Zadig.
3. If you receive a “command not found” error, please check your avrdude installation and ensure that your path variable is correctly configured.